Ex Why Zed Print logo

Create Your Perfect Bound Book Cover File

Right then, let's get started with creating your perfect bound book cover file! 
⚠️ Please note: this guide shows how to layout a book cover using Adobe InDesign. To print, we just need a PDF file and you can save artwork to PDF in all major programs including Affinity Publisher, Quark Express, Publisher, Word and even all time classic like Powerpoint and Corel Draw.
Unlike your text pages (which should be supplied as single pages) your cover needs to be supplied as a spread. Exactly as your finished book will appear if you opened the cover and laid it flat on the desk.

The cover artwork file will have two pages: page 1 is the outer cover and page 2 the inside covers. Page 1 reads (from left to right) Back Cover/Spine/Front Cover. Page 2 reads (again from left to right) Inside Front Cover/Spine Allowance/Inside Back Cover.

Before we begin, we will just say all of our website's guides on file set-up are for Adobe InDesign which you can get on a one-week free trial or buy on a month-to-month deal. However, as long as you can export your finished work to a high res pdf, do feel free to use your favourite program. Other options are Affinity Publisher, Quark Express, Illustrator, and even Word or Publisher. The same principles and guides still apply when preparing your layout. If you cannot set up your artwork, do ask, we have a wealth of print knowledge and will do our best to help.

design a perfect bound book cover

Book Spine Sizes

Now onto the actual layout…first off you’ll need to know how big your spine size is. The width of the spine depends on how many pages your book has - it's simple but the more pages, the thicker the spine needs to be to wrap round them all. Best not to design the cover layout before you have finished your inside page artwork because if the number of pages changes the spine will get bigger or smaller.

We have listed a few of the common spine sizes here to give you an idea of your book's thickness. If your number of pages or stock isn't listed then drop us an email at hello@exwhyzed.fixed-staging.co.uk and we will be happy to advise on the correct size.

Inside pages onto 115gsm Uncoated

36pp to 44pp Text = 3mm spine (ie: if you have 40 pages then you need a 3mm spine)
48pp to 60pp Text = 4mm spine
64pp to 72pp Text = 5mm spine
76pp to 88pp Text = 6mm spine
92pp to 100pp Text = 7mm spine
104pp to 116pp Text = 8mm spine
120pp to 132pp Text = 9mm spine
136pp to 150pp Text = 10mm spine
200pp Text = 14mm spine

Inside pages onto 130gsm Silk

36pp to 40pp Text = 2mm spine
44pp to 56pp Text = 3mm spine
60pp to 76pp Text = 4mm spine
80pp to 92pp Text = 5mm spine
96pp to 112pp Text = 6mm spine
116pp to 128pp Text = 7mm spine
132pp to 148pp Text = 9mm spine
200pp Text = 11mm spine

Inside pages onto 120gsm Evolution Uncoated

36pp to 44pp Text = 3mm spine
48pp to 60pp Text = 4mm spine
64pp to 76pp Text = 5mm spine
80pp to 88pp Text = 6mm spine
92pp to 100pp Text = 7mm spine
104pp to 116pp Text = 8mm spine
120pp to 132pp Text = 9mm spine
136pp to 150pp Text = 10mm spine
200pp Text = 14mm spine

Book Cover Design Video Guide

Once you have worked out the correct spine size our video tutorial will guide you through preparing the cover. Yes, this does mean you don't have to read the rest of this page! #win)

Download Book Cover Templates.zip

We have included a selection of finished cover templates for A4, A5 Portrait, A5 Landscape and 210x210mm books with the most common spine widths.
Choose the correct one for your book and spine size. Open it in Adobe InDesign, add then style your cover artwork then export to pdf. Then click here to jump ahead for instructions on exporting the finished file to PDF.

Save even more time and download a finished cover template here. #winwin

Download Book Cover Templates

Illustrated Guide on Setting Up Cover Artwork for Printing

Now you have the spine size noted down we can open up Adobe InDesign.

We advise using this program because it’s the most user-friendly and the industry standard for page layout. Any program that you can Save As or Export As a PDF will work too.

The example here on the right is for an A4 book cover with a 4mm spine.

Next follow these instructions…

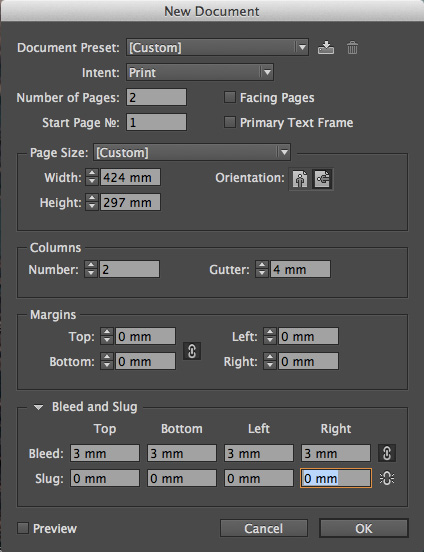
• In the ‘Number of Pages’ type ‘2’ and Untick facing pages.
• ‘Page Size’ is the only tricky bit and this is where you’ll need the spine size you noted down earlier. An A4 book has a width of 210mm so to work out the width of your InDesign cover template page you need to add the back cover (210mm) to the front cover (210mm) PLUS the spine. In this example the spine is 4mm so the total width is 210+210+4=424mm.
• The ‘Height’ is a lot easier – that is just the height of your book: 297mm for A4, 210mm for A5.
Moving down the page, change ‘Columns’ to ‘2’ and the ‘Gutter’ to your spine size (4mm for this example).
• Your ‘Margins’ can be changed to ‘0’ and the four ‘Bleed’ boxes should all be ‘3mm’. Slug can be left on ‘0’.

Easy! Now go ahead and click ‘OK’.
perfect-binding-cover-set-up-1

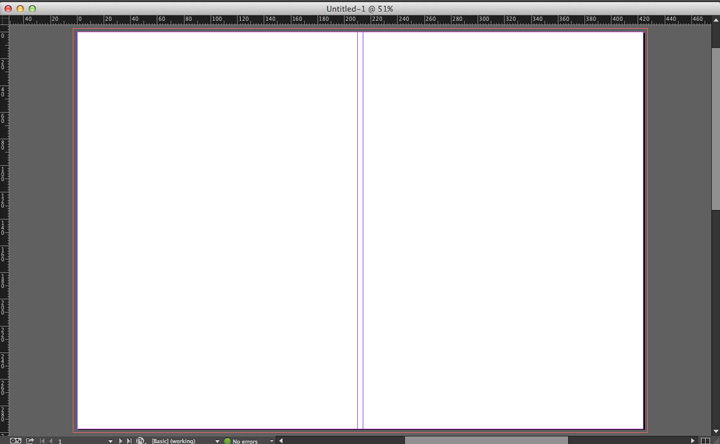
A new file now opens up which should look similar to the example below.

You see the back cover on the left, spine through the centre and front cover on the right exactly as expected.
perfect-binding-cover-set-up-2

In the Tool menu choose the Line Tool.

With this selected, click on the artwork page and whilst holding down shift drag out a vertical line down the page. At this stage it doesn’t matter how long the line is or it’s placement.
perfect-binding-cover-set-up-3

You now set the dimensions of the line in the Measurements Box.

The aim is to get two vertical dashed lines that show where the spine will be folded. These run straight down the spine guides on your file. In the measurements box there is an icon with 9 tiny boxes, click the top middle one to select that as the dimension your are changing.

If your book is A4 then the line needs to be positioned at 210mm. If your book is A5 then it should be at 148mm. Type this measurement into the ‘x’ box. Set ‘y’ to -15mm. ‘L’ or the length needs to be 30mm longer than the height of your book so 327mm for an A4 or 240mm for an A5. Press Return or Tab and the line will now reposition on the page, starting 15mm off the top of the page and extending all the way to 15mm below the footer.
perfect-binding-cover-set-up-4

Next we change the line to a dashed one in the Stroke menu.

Select the – – – line and make it 0.5pt. Again, press Return or Tab and the line will change again on the artwork page.
perfect-binding-cover-set-up-5

We are now going to duplicate the first line onto the second spine fold.

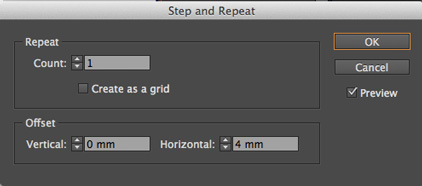
With the first vertical line still selected, choose Edit > Step and Repeat or use the Mac keyboard shortcut Alt-Cmd-U to bring up the ‘Step and Repeat’ menu. ‘Repeat’ should be ‘1’ and ‘Horizontal’ is your spine width.
Clicking ‘Preview’ will show you what is about to happen. Go ahead and click ‘Ok’.
perfect-binding-cover-set-up-6

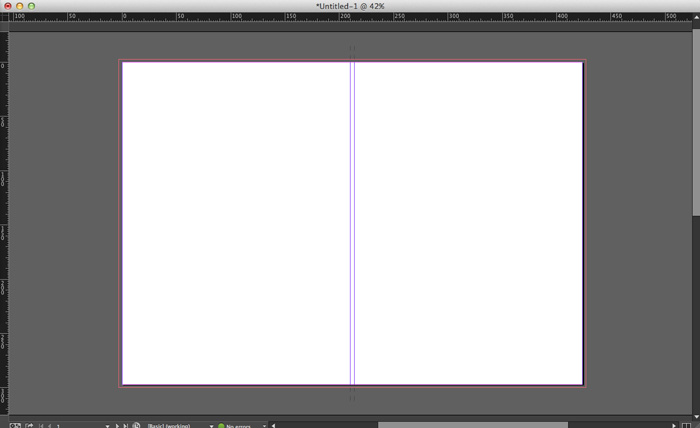
You will now see two dashed lines vertically on the page and they should be over the top of the gutter lines we created earlier. 

These guides show our finishing guys at Ex Why Zed where to fold your covers after they are printed.
perfect-binding-cover-set-up-7

We need to block out the dashed lines so they dont appear on your finished books so choose the Image Box from the Tool menu.

perfect-binding-cover-set-up-8

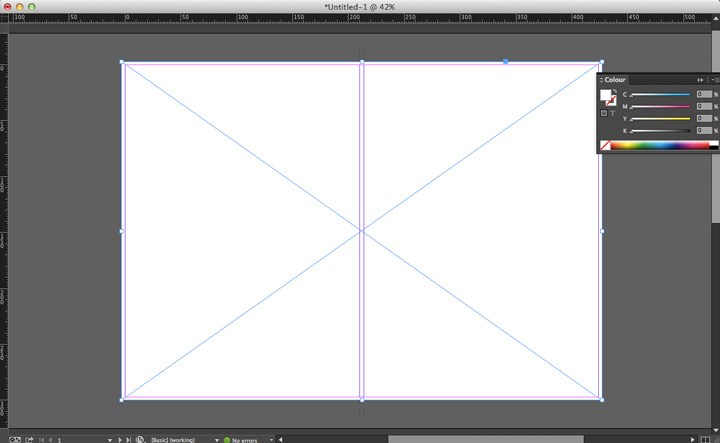
Drag a new image box from the top left hand Bleed corner to the bottom right.

This should now span the whole page as per the example below. Open up the Color menu and whilst the image box is selected fill it in white. (0/0/0/0 on the CMYK slider).
perfect-binding-cover-set-up-9

Almost finished now…

Select the two lines and the image box using the black arrow tool or the keyboard shortcut CMD-A to Select All.
Copy them by choosing Edit > Copy or CMD-C.
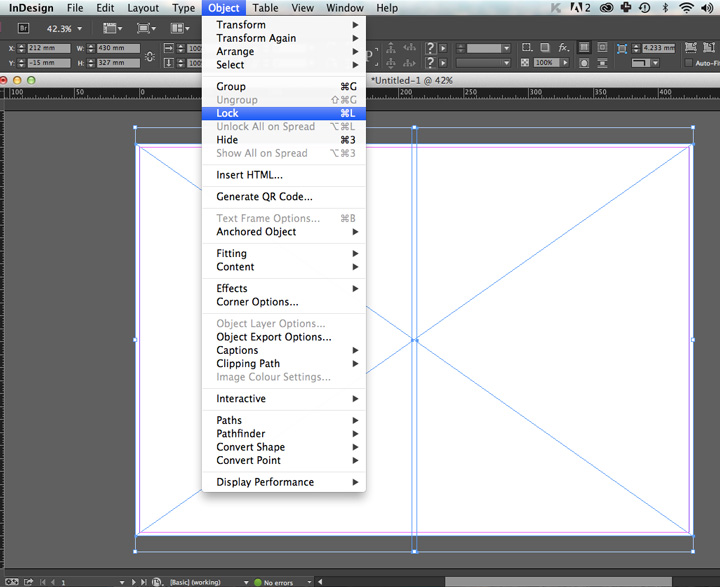
Then go to the Object menu and pick ‘Lock’ or the shortcut CMD-L.
This copies the lines and box so we can use them on page two of our template and also locks them on page 1 so they sit happily in the background while you go ahead and add your artwork.
perfect-binding-cover-set-up-10

Scroll down to page 2 of your file.

Click on the main area using the black arrow tool then choose Edit > Paste or CMD-P. The lines and box you copied from page 1 appear.
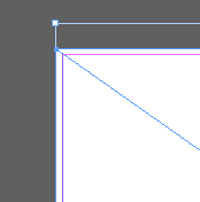
Select All using the black arrow tool or CMD-A and drag them to the top left so they sit perfectly on the page in the same position as they are on page 1.
Your white box should sit neatly in the corner of the bleed area as shown in the example to the right. Again, Select All then Lock then guides and white box so it cant move during the design process.
perfect-binding-cover-set-up-11

All done! Now go ahead and save your file.

perfect-binding-cover-set-up-12
Adding your cover artwork

Now it’s time to add and style your artwork

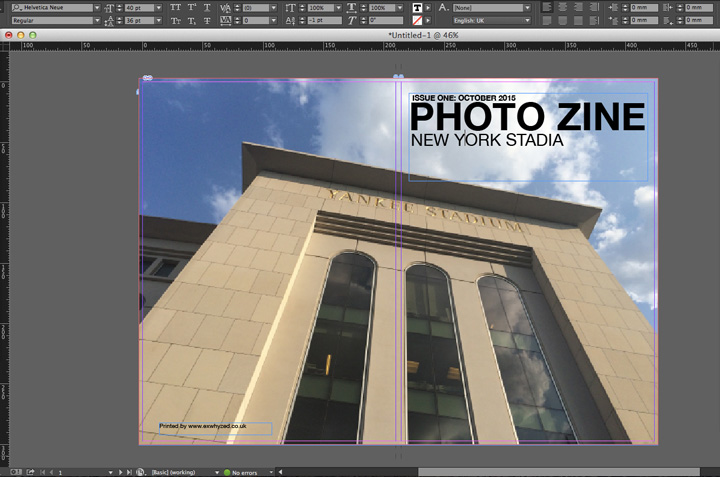
In this example we have dropped in a fetching, full bleed photo of Yankee Stadium.

You might want a full wrap image like this for maximum impact or maybe just an image on the front cover with some text.
book-cover-for-print

Once you’re happy with how it looks then save your file.

saving-your-cover-for-print
Export to print

We can’t print from an InDesign file so export the artwork to a PDF for printing

Choose File > Export or CMD-E. Type your filename and click Save.

exporting-your-cover-for-print

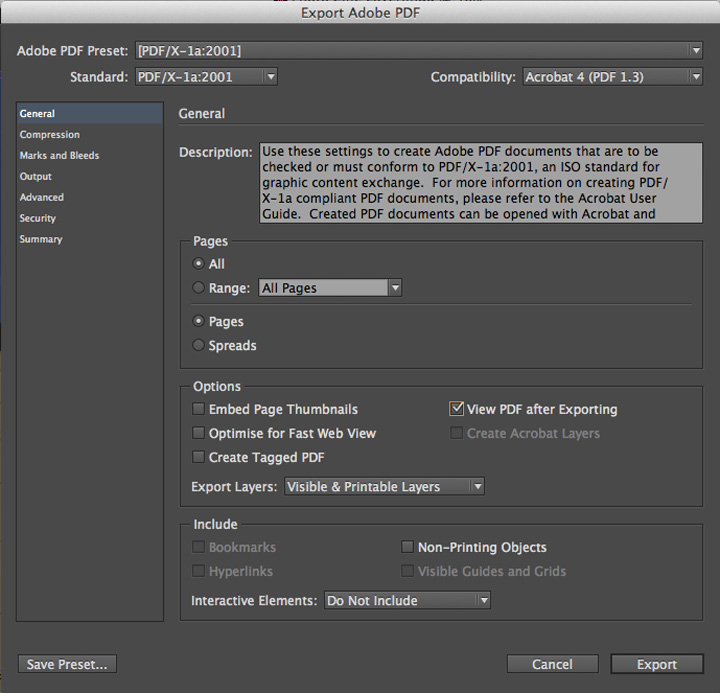
On the Export to PDF dialog box choose PDFx/1a from the top drop down menu.

cover-export-options-1

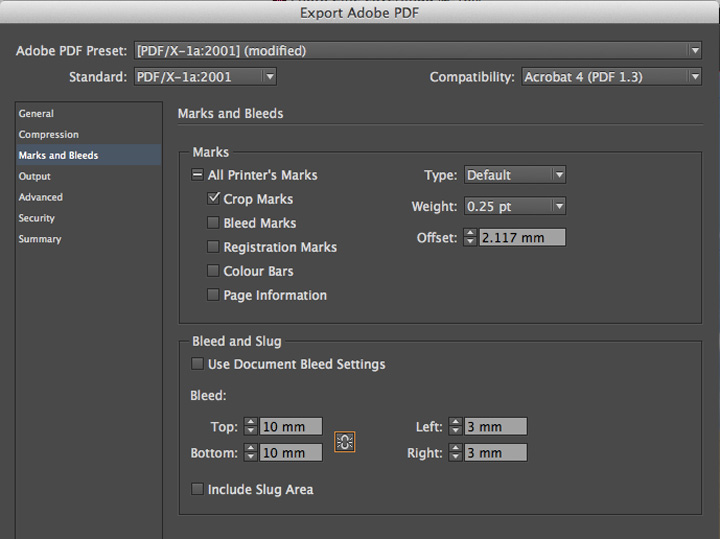
Then click ‘Marks and Bleeds’ down the left hand side

Tick Crop Marks. In the four bleed boxes type 3mm in Right and Left and 10mm in Top and Bottom. Then hit Export and send us the file ????
cover-export-options-2

When your artwork is designed and printed it will look like the image to the right.

You can see the back cover on the left, spine in the centre and front cover on the right – exactly the same as you designed it!
cover spread for printing
COVER DESIGN TIPS and FAQS

Keep your spine text small so it doesn’t slide off

If your spine is less than 5mm we recommend not putting any text on it to avoid any risk of it sliding round to the front or back cover when your books are bound.
create your cover file hero image
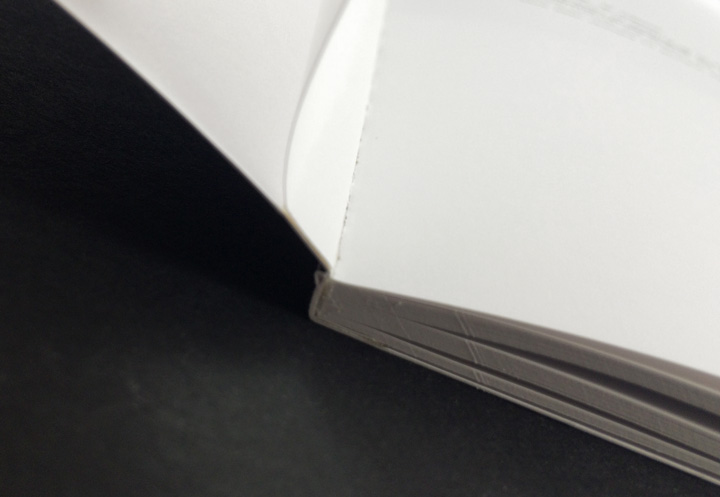
Your cover is glued onto the first and last page of your text block. Therefore any content within 8mm of the spine on the first and last text page will be obscured so keep important information (page numbers, headings etc) out of this area.
cover-hinge
For more design tips and considerations check the Styling Hub and File Set-Up Knowledge Base in our Print Journey

Perfect Bound Book Cover Set-Up Checklist

  1. Export a Hi Res PDF with crop marks and 3mm bleed on each edge
  2. Artwork should be supplied at the same size your book will be printed
  3. Supply one file for front & back cover with spine (Ask us for spine width)
  4. Text file starts with 1st right hand inside page then follows in reading order
  5. You lose 3-4mm in the spine gutter on every page – keep info clear especially faces and important text.
  6. There is a hinge on the 1st & last text pages where the cover is glued. This can hide content so keep anything important at least 10mm away from the spine edge.
© 2023 Ex Why Zed Ltd. All Rights Reserved | A suggestion to the rest of the print industry - why not use some brain power and creativity to write your own content rather than copying ours again? | Website by Catchfish Online